


Survival Bars With Oats and Honey to Last for 20 Years Leave a comment
One of the single most important survival resources, especially in long-term survival scenarios, is food. Sure, lots of folks put emphasis on water because you can only go a few days without it, but just a few days without food means your mental and physical energy tanks are going to be empty, and you’ll be struggling to keep it together.
But the problem with storing lots of food for long-term use is that most of it won’t last a long time: Food spoils and requires constant rotation. There are special survival foods out on the market you can buy, but most of them are very expensive on a per-calorie basis…
You can take care of both of these problems at once simply by making your own survival bars at home from stockpiled ingredients. They are nutritious, sweet, filling, and capable of lasting a very long time, up to 20 years in the right conditions.
Best of all, it’s a whole lot easier than you might think with just a few simple ingredients and tools. Keep reading and I’ll tell you what you need to know below.
Will These Survival Bars Keep You Alive?
Yes, they sure will. Although they are not nutritionally complete, they have a lot of calories for quick energy, in the form of carbohydrates and protein alike, along with a variety of vitamins and minerals that your body needs.
Not something you can live on alone, and you probably won’t want to because of menu boredom, but they definitely beat starving or going without.
Do They Taste Good?
Yes, they do. They are very sweet owing to high levels of sugar, but this is a necessary trait for them to provide lots of energy in a very small package.
If you want a savory survival ration, you might want to look at a different recipe, but if a sweet treat sounds like something you’d like, these are wonderful.
Ingredients and Tools
You need only a few ingredients to make this recipe, and some basic kitchen implements. Check out the list below, gather what you need, and then we will get started.
Oats, Regular or Quick, 2 Cups: common oats that you can buy at the grocery store. Regular, rolled, or quick-cooking varieties are all good. Avoid varieties like steel-cut oats that require extended cooking times.
Powdered Milk, Non-Fat, 2 Cups: powdered milk will help to bulk up and bind the ingredients in the recipe together, and add some much-needed protein.
Use any variety you want as long as it’s nonfat and fresh. Now’s not the time to use an opened package that has been lurking in the back of your pantry!
Gelatin Dessert Mix, 3 ounces: any gelatin dessert mix that you want to use will be perfect here. It can be Jell-O or any other brand.
Citrus flavors work well and impart a nice fruit and cream flavor to the bars, but you can use any flavor you want. Note this is not pie filling or pudding! You want the mix that makes the jiggly stuff.
Protein Powder, Whey, 3 Tbsp: whey protein powder adds tons of protein to these bars, which is important for sustained energy. Most recipes tend to be pretty low in protein so consider this a necessary ingredient to craft the perfect survival bar.
Honey, 3 Tbsp: honey adds even more calories, improves flavor, and also acts as a binder which will help your bars hold together after baking. Without it, they will turn into a crumbly kind of granola.
Sugar, 1 Cups: white sugar. That’s it.
Water, appx. 3 Tbsp: plan on meeting about three tablespoons of water to incorporate your ingredients into a coarse, crumbly dough.
Note that you might need a little bit more in order to attain the right consistency, add in half-tablespoon to tablespoon increments. I’ll note this in the recipe instructions where required.
Mixing Bowl, Large: a large mixing bowl will hold all of the dry ingredients and then allow you to mix in the wet ones to form the dough.
Saucepot, Small: a small saucepot, holding about a quart or even a little bit less, should be adequate for preparing the wet ingredients prior to mixing.
Whisk: a whisk is useful for thoroughly mixing your dry ingredients together, and stirring your wet ingredients when simmering, but it won’t be useful for combining the wet and dry ingredients. They are just too thick and chunky.
Wooden Spoon: a wooden spoon is the perfect manual tool for mixing all of your ingredients together and incorporating them. It will be a workout, but works just fine.
Stand Mixer (optional): if you have one, this recipe is the perfect time to bust out a good stand mixer since the dough gets very thick and heavy once formed. Not strictly necessary for this operation, but very nice to have!
Baking Pan: you’ll bake these survival bars in the oven, and to do that you’ll need a good baking pan. It should be sized at least 9×11 inches (8×29 cm), and at least an inch deep.
Rolling Pin: flattening, compacting, and forming the mixture is essential if you want the finished product to actually hold together as bars. A rolling pin or similar tool is just the ticket for this process.
Parchment Paper: it is vital that you line your baking sheets with parchment paper to prevent the resulting bars from sticking to the pan. If you have to pry them loose, they’ll shatter.
Knife: any good knife will help you cut your formed dough into nice, tidy bar shapes.
Pastry Cutter (optional): if you want your bars to look a little nicer, or just one excuse to use the tool, you can use a pastry cutter to cut your bars to size.
Food Storage Bags: any long-lasting survival food is only as good as its packaging. At a minimum, invest in heavy-duty plastic food storage bags for storing them.
Vacuum Sealer and Mylar Bags (optional): to maximize shelf life, store the bars in a vacuum-sealed mylar bag that is rated for food storage. These will keep your bars fresh in storage for many years on end as long as the storage conditions are favorable.
And that is all you need. Not too bad, right? Now let’s get on to the instructions.
Step-by-Step Recipe Instructions.
The following recipe instructions are quite simple, but nonetheless, you should review all of the steps in their entirety before you begin. This will give you a better idea of what to expect.
Step 1: combine dry ingredients, mix. In the large mixing bowl, add the sugar, powdered milk, protein powder, and oats. Use your whisk to thoroughly stir them together until totally combined. Set aside for now.
Step 2: combine wet ingredients. In your small sauce pot, add the gelatin, honey, and water. Stir everything together thoroughly with the whisk. You want a smooth but viscous consistency. Add just a little more water if needed.
Step 3: bring saucepot to boil. Bring all the ingredients to a rolling boil, whisking thoroughly once it starts to simmer. As soon as the ingredients come to a rolling boil, remove them from the heat.
Step 4: combine wet and dry ingredients. Carefully pour the wet ingredients into the mixing bowl containing the dry ingredients. Stir everything together thoroughly with a wooden spoon, and be ready to put in a little effort because it will thicken significantly. You have a stand mixer, now’s the time to use it.
Step 5: add water if required and knead. If the dough isn’t coming together, add a little more water a half tablespoon at a time. Use your hands to combine all the ingredients thoroughly.
Step 6: test dough for consistency. Grab a small quantity of the dough and then squish it in your hand like you’re trying to crush an egg. The dough should hold its shape once you relax your grip. If it crumbles immediately, add a little more water, mix, and try again.
Step 7: line pan with parchment paper. Cut enough parchment paper to completely cover the pan all the way to the top of the sides. It’s helpful to leave a little bit extra in case of overflow.
Step 8: Place dough into pan.
Step 9: press out the dough. Using your hands, pack the dough into a uniform layer.
Step 10: roll dough. Use your rolling pin to press and compact the dough all the way to the edges of the pan. Ideally, your dough should be about half an inch thick or a little less. Thicker bars are much harder to bite into.
Step 11: slice dough into bar shapes. Grab your knife or your pastry cutter and carefully cut all the way through the dough to form bars. I like to cut them into 4×3-inch bars.
Step 12: bake at 200° F for 2 Hours. Preheat your oven to 200° F / 93° C, and once the temperature is fully up, pop the pan in. Set your timer.
Step 13: remove from oven and cool. Once the bars are finished baking, pull the pan out of the oven and set them aside to completely cool.
Step 14: lift out parchment paper and separate bars. Once the bars are totally cool, carefully lift out the parchment paper and then separate the bars from one another.
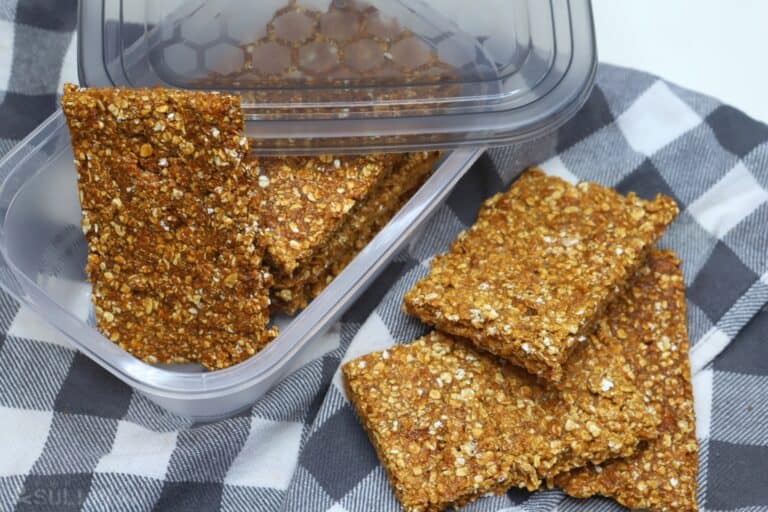
Step 15: pack and store. Store your bars in an airtight container of your choice and then keep them in a dark, dry room temperature environment for maximum shelf life.
Step 16: done! You are tasty, filling survival bars are finished and ready to eat.
Maximizing Survival Bar Shelf Life
These survival bars can last a surprisingly long time as long as they are stored properly. One of the most important factors for long shelf life is a good storage environment. The idea is room temperature or a little cooler, say between 60° F and 70° F (between 15° C and 21° C).
Also, keep them in the dark and dry. Moisture is the enemy! Keeping them out of direct sunlight and away from drafts will help prevent condensation which will absolutely ruin them.
Lastly, it pays to invest in better containers. Common zipper food storage bags work fine, but for maximum shelf life, you’ll definitely want to consider investing in those vacuum sealer bags. Those will allow your bars to last as long as anything you might buy off of the shelf or rack at the camping store!
If you store them in a vacuum-sealed bag as soon as they cool, and keep them in a temperature-stable storage environment, they should keep for a couple of decades. In a plastic storage bag, they will keep for about 5 years or longer.
As always, check, test and if needed rotate at periodic intervals!
Recipe Variations
Try different gelatin dessert mixes. As long as you are using powdered gelatin dessert mix, there’s no harm in trying other flavors. Maybe you’d like cherry instead of citrus? Anything goes here as long as you stay away from the pie filling and pudding varieties because they just won’t work.
Try different protein powder flavors. Another way to add different flavors is by switching out the protein powder. If you have a favorite brand or a particular flavor that you really enjoy, now’s the time to use it.
Chop the oats. You can enjoy a different texture altogether if you chop your oats prior to preparation. A few quick pulses in a food processor will be enough and tend to make the bars a little denser, texturally.
The post Survival Bars With Oats and Honey to Last for 20 Years appeared first on Survival Sullivan.